A couple weeks ago I won a brand new Star Wars Armada gaming mat in a radio contest put on by B.I.G. Unnamed Armada Podcast and ImperialStarShop. I feel like I owe those people some advertising, so here’s a review! I know that all parties involved in me getting this mat will read this, and I hope to provide an honest, but not brutally honest, review based on my opinions and experiences.
I’m not a gaming mat connoisseur, but I’ve used a couple in my life.
Here’s some pictures.
TL;DR: Buy this mat, it’s pretty great.
The first thing I notice is that this is a heavy mat. The box it comes in feels like the right weight, but it isn’t until you take the mat out that I noted that most of that weight is in the mat. It came well packaged in a perfectly sized box and with a thin protective plastic sheet around it.
Rolling it out, I sat it next to my Gale Force Nine vinyl mat. The GF9 mat is comparatively light, and has some scratches and feels like it may tear or crease at some point. The ImperialStarShop mat will very clearly do none of that. Another notable difference is that the vinyl “holds” it’s curl from being rolled up, where the mouse-pad material lies very flat. The ImperialStarShop one has a slight curl at the very end where the roll is tightest, but all of us are used to much worse than this.
I have a couple mouse pad mats for other games, and this one feels higher quality. The edges don’t just end, they are sewn down in a really nice finish. The additional weight has a bunch of benefits. It stands up on it’s own when rolled up — that photo against my kitchen island I expected it to slouch a bit, but it held itself up really good. The thickness feels like it gives the mat a sturdiness that some other mats don’t have.
The colours have some really strong pop to them in the brighter areas like the lens flare off the planet, or the nebula in the other corner. However, from a distance of “standing above it with it on my floor”, the middle star area looks somewhat barren and dark. It’s not until you get closer (maybe tabletop distance?) that the stars in the non-planet side appear brighter. That lens flare off the planet looks just as awesome in person as it does on the screen!
I really like that this mousepad mat is matte, rather than the glossy look of the GF9 vinyl mat.
While the mats weight brings a lot of benefits, it has one downside to me. I often take public transit to gaming events and the weight may be enough to decide not to bring it along. If you’re driving, maybe this isn’t as important. I also have a nice mat carry-bag (currently full of mats for games I don’t play anymore) that may be useful here.
Lastly, and nothing to do with the mat, but I feel like the ImperialStarShop website design and layout doesn’t showcase the quality you’re getting out of this company. Their website doesn’t look great, but the mat does. I’m not sure I would have bought this mat from them based on how the website looked. That’s me, I sometimes make superficial decisions.
Summary: Great mat, so stoked to have it and I look forward to playing more in-person Armada so I can show it off!!
The Prime in Redmond Washington was the other Prime close enough to consider driving to. Spokane was a little far for a day trip, Redmond is just a long day of driving.
I picked up fellow Vancouver Armadaites Duke and Matt starting at 7:30am and we drove 3:15 hours down the way to barely make it in time for an 11am event start time. I don’t love cutting it that close.
I pulled out the brand new Starhawk that I had opened up on the drive down and plugged it into my lovely display tray. Many ooohs and aaahhs were had. Even though Armada doesn’t have a good hobby culture, Star Wars nerds enjoy Star Wars swag.
I’ve been iterating on a Starhawk list for a while, and this was the final. I’ve tried Mk. II, I’ve tried the Scout Frigate, I’ve tried a couple different squad balls, I had the tractor beams at one point, and completely different objectives.
On Friday afternoon I was agonizing over my Yellow. Days earlier I had Hyperspace Assault, because Admo is quite nice in there. But play testing against James, he easily choose it, and it lost me some deployment advantage and activations as well and I felt it wasn’t worth it. There are many good choices, but I wanted one I didn’t have to practice, thus Capture the VIP and a VCX. That was my biggest regret about the fleet, although there are many things I’m going to change for the next iteration.
Mr. McChonky!
Game 1
15 minutes after arriving, I was matched against Shmitty. Yes, the same Shmitty who is Armada-famous for writing for Steel Strategy. Yes, the same Shmitty who 10-1’d me from 4th to 8th in the Vancouver Prime. Yes, the same Shmitty who made me write this prophetic text to Duke at 6:30am:
“Can’t sleep, shmitty will eat me”
While he tabled me last we played, I had no expectations going into this game. I had practiced with this fleet, I knew my plan, I knew what I was going to do. He is an excellent player, but even excellent players have bad days.
He tabled me again.
Set up. We played my Capture the VIP, after I choose to go second.
While I made a number of mistakes in this game, none of which were good, one stands out — I dodged Admo on turn 1. I did a little Z-like forward move out, because it was getting to far ahead of Unity and I wanted them together to give multiple targets his Starhawk could get a shot on. It’s so subtle as to not necessarily be noted as a mistake, but it is why I lost this game. (although I could have lost still, with having not done this).
This ended up putting Admo to far out to keep in the front arc of his Starhawk without putting myself into a double arc, so I put Admo in his side. This seems like a fine choice, until a turn later Admo is like 3mm away from being able to double-arc black-dice his Starhawk.
In hindsight, first turn, I should have just moved straight forward and accepted that he was going to 4-Red dice Admo and taken it on the chin.
That was, I think, the game losing move. But a couple other small things:
While trying to get Admo away at the end, I was worried about running it off the table so I turned in a bit, which brought it to close to his Pelta and gave his Pelta a final shot to table me. That was a really stupid mistake.
He had been ramming my flotilla with the 50-point VIP token, and I knew what he was trying to do, but I changed my game plan to react to this to slowly. I set a Repair dial, to get a Repair token, then next turn do a Repair command to get a hull back 1 turn to slowly.
Between these two things, I think I could have brought it to a 9-2 instead of a 10-1, which would have made a notable difference to my final tournament score (see “Results”, below). The score was 400-48, because I killed 3 YT-2400s. Interestingly, no one got the VIP token, because he killed the GR which dropped the token and then he tabled me, so there was no turn 6 and he didn’t get a chance to get it! He wisely decided to kill Admo and for-go the token.
Both our Starhawks rammed 3 times. It overhangs so much we had to take mine off. His had 4 hull left at the end.
Game 2
After getting spanked down to the bottom of the bracket, I prepared myself to play against my fellow 1-pointers. My opponent was a fellow named Chase who had brought a very minimalistic fleet:
3 ISD-IIs.
All with: Leading Shots, Proximity Mines and Gunnery Teams
Admiral Motti
That is a lot of hull. Apparently he got 10-1’d by an SSD that somehow managed to table him. Wow.
I choose second player and he picked Capture the VIP. I bait-deployed with my GRs and squads, as he only had 3 ships, so I put Admo and Unity in position to flank and make him bump himself. He did ok with Nav commands and managed to bring them around, but I got mostly what I wanted, which was to only take on one at a time.
I tried to flank and rear with Admo because I didn’t think it would be able to survive in his overlapping Gunnery Team front arcs, but this decision led to Admo chasing after speed 3 ISDs as second player, which ultimately left it not doing anything useful.
He tried to put proximity mines all around the VIP token, but because I had the VCX I dodged in to put it somewhere safe and picked it up and ran away with it.
I got one of his ISDs plus the VIP token and he got one of my GRs which ended with 175-24, an 8-3 for me. I felt like I needed a 10 out of both of these games to be get somewhere near 3rd or 4th or 5th pace overall, so while it was nice to win this one, the 8 left me out of any kind of position to achieve the goal I’d set out for.
That is to many large triangles.
One ISD down, 2 to…wow, it’s turn 5 and there’s just no way.
Game 3
Last game I got up to the middle of the pack. I was setting up and having social banter with my next opponent when I say something about not being much of “something” around here (I don’t remember what “something” was). I meant around this tournament, but he thought I meant the regional area of Redmond, so he responded “I’m not from around here” and I asked “Where are you from?” and he says “Abbotsford”, and I say “Andrew?”. 😛
He’s a local Vancouver-area player who I’d seen on the forums a bunch. He and I are pretty sure we’ve never met, but Duke says we have!
He’d brought 2 ISDs and an Onager Testbed, so very similar list as my last opponent, but with a longer stick. I choose second player and he picked my Infested Fields. I had learned from my previous opponent and did better with Admo, bringing it to a decent spot and allowing my opponent to shoot at it, in order for me to ExRacks+OE his first ISD. I was happy with that, but I’d managed to turn his fleet into a conga-line (no good for Imperials), so I went down the line and cleared the Onager and then the final ISD. Both the first ISD and Onager I got a lucky last shot that did exactly the right amount of damage to remove it. Efficiency!
At the end of this game I had an epiphany about getting tabled by some of the best players in the world, vs the middle of the pack players. The best players I think have a skill at bringing a sufficient “weight of fire” to a focus. In this game, Andrew was firing 10 damage Onager shots at my SH every turn, and every turn I had enough defense tokens to tank it. Other games, I’ve been chucking tokens left and right trying to stop damage from incoming!
This one finished 460-39 for me, a 10-1, and one that ultimately jumped me to the top of the list of players who had 19 tournament points (which there were a few).
Usually you go to events like this to play people who aren’t local to you, but I’m super glad I played Andrew so we could meet!
Results
There were 24 (25?) players at this event, and I came up 7th with 19 tournament points. Even though it’s a similar placing as my last event, this one felt better because it there were a lot more people playing, which means I had more competition for the spot.
I’m probably misremembering, but I think they started calling 19 points at 14th or so, and I was a little disappointed that I was going to be 13th. Then they went through 7 people who all got 19 points, and because I had such a huge MOV on game 3 I got first among the 19 point players. I got 3rd in the Rebel faction too!
This was my largest Armada event, and the largest event I’ve played in since I stopped playing Warhammer or Malifaux, so that’s pretty fun.
This was a great day of rolling dice and moving plastic space ships!
Other Fleet Stuff
I think I’m going to continue on the Starhawk train for Adepticon. That event is a month away, and while I could try a few different things, I really like the Starhawk and I think I’m pretty close to making it work for me.
Although Admo is a great ship, and has been a great ship for me, I think it doesn’t have a place in this fleet. It’s an excellent first player ship, and I’m vying for second. I got to choose first/second every time (with 397 bid!!) in this tournament, but Admo could have helped ensure I get given 2nd, but I think there are better ways for me to spend those points.
The Biggs+1300 ball was pretty effective, but as I only played 4 YT-2400s across all games all day, it’s hard to judge it. Several people who did very well with the Starhawk played with 2400s, so I think I’m going to head in that direction instead.
This lets me save points on Wedge as well. Wedge is a great Officer, but I don’t think I used him as well as I could have. I actually forgot him in my Shmitty game, which then ended up with him overlapping my 1300s which gave them way more movement than they’d have had with Wedge. 🙂
Capture the VIP was the right choice at the time, but is a lame objective that I think I can do better than. That let’s me get rid of the VCX as well.
This starts a little personal, but I promise it’ll even out, and then we’ll get to battle reports!
I had a fantastic day and 3 great games against 3 great opponents, and playing with plastic ships is always the best time, but at about 6pm I had a disappointing shock.
I felt like I’d practiced, I felt like I had a good feeling for playing a fleet that would both hold points and take points and lead to some big wins, and it didn’t at all. My first game, I played the eventual last-place person, which rocketed me into position to play the eventual winner and the eventual second place (who is a previous continental champion and who writes an Armada blog and is internet famous) and between the two of them I got tanked down to 8th out of 10. I felt like 5th was likely, 4th was still possible, but not definitely not 8th.
Shocked, and kind of embarrassed, as several people commented on how well I was doing.
I woke up at 4am the next morning, as one does, to review my performance, I decided that these feelings were misplaced, because this was on me. I decided I wanted to get top ranking, I got the chance I wanted (to be the best, you have to play the best) and I came up wanting, that’s all. This realization was empowering. All that happened at this event was that I got told, in a very direct manner, that I hadn’t done enough work to reach my goals. And if my goal is to earn a ticket to Worlds, then what I’ve learned this weekend is what actions I need to take in order to reach that goal.
Now to take those actions, and get to Redmond.
Games
I’m not going to go into detail of what people brought, largely because I didn’t write it down. I’m hoping it will be in the Prime Data Spreadsheet before long. It isn’t as of this writing.
My Fleet
Assault Frigate Mk.II B
Admiral Ackbar
Caitken and Shollan
Electronic Countermeasures
Turbolaser Reroute Circuits
MC30 Scout Frigate
External Racks
Turbolaser Reroute Circuits
Admonition
CR90 Corvette A
Ezra Bridger
Turbolaser Reroute Circuits
Jaina’s Light
GR-75 Medium Transports
Comms Net
Lando Calrissian
Shara Bey
YT-2400
2x VCX-100 Freighter
Gold Squadron
Red: Ion Storm
Yellow: Fire Lanes
Blue: Sensor Net
Fun times: writing that out I just noticed this fleet is not what I had sent the organizer. My fleet builder hadn’t saved my last revision on Wednesday night. >.> Soooo…some minor cheatery. All my opponents thought I played the above fleet (because I thought it was what I was playing), and I played with the above fleet for the entire event, so the only cheatery was in reporting, so hopefully it’s a minor embarrassment instead of an actual problem. <.< (I’ve written to the organizer letting him know.) (and he wrote me back saying all good, it happens).
I came to this fleet because I don’t love Rieekan, Raddus hasn’t worked out for me, and Dodonna has been encouraging me to play black dice fleets that are very glass-cannon and tend to bleed points. I wanted some more durability, and I hadn’t played with Ackbar much.
From there, I examined the Prime data spreadsheet to see what people were playing. I wanted a Scout Frigate, because I think they are cool ships. Initial versions had a Pelta with IF, then Liberator with IF on the CR90, and then gone entirely. I also had fewer squadrons initially, and then a HWK and then it was gone, once I realized that the unspoken goal of my fleet was to subtly encourage my opponents to choose Ion Storm every time. With that knowledge, I dropped the HWK (didn’t need it if I won’t actually play the VCXs for Strategic), and added Gold and the YT.
Then, knowing that Ion Storm was the plan, Ezra joined in so I could move obstacles around to more useful positions for me. As well, the TRCs on all ships was a direct response to expecting Ion Storm all day, because TRCs make less sense on the AF over all.
And although I didn’t do all that well, I’m really happy with how this fleet worked out. I think it heads in a direction that masks a strategic weakness of mine — that I really like throwing my ships into a close melee and taking them off the table. The problem isn’t so much that it’s a bad plan, so much that I’m not good at angling double arcs into making it an effective one. With Ackbar, you just have to get massive side arcs on things, which is much easier for me. I think that future fleet revisions will be trying to make Ackbar work better for me.
Game 1
I randomly drew Alex Yuen, who I’ve played before in Warhammer 40k I believe. He’s a long-time staple of the community, and was even the fellow who gave me the ISD to crash into my Jakku board. He was playing a squad-less Empire fleet with a red/blue ISD, a close-range Harrow VSD, Demo, and a Gozanti.
His bid was 10 to my 9, and he choose first player and picked Sensor Net. I thought this was an odd choice, as I felt like I had enough VCXs in my fleet to prevent anyone picking Fire Lanes or Sensor Net, but no problem, let’s do it!
First turn I squadded my VCXs to pull the tokens closer so I could start gaining tokens. As you can see from the photo above, I deployed to try to circle him with my broadside fleet and I hoped to grab the tokens from him quickly as I could start pinging 4 of them a turn. My hope was also to try to block his ISD with his VSD so I didn’t have to tackle both.
By turn 3 my token plan was mostly working. He ended the game with a single token, but unfortunately I had misplayed a couple of them and only ended with 5. There were a couple times when I had a choice of which token to use, and in my rush I choose the wrong one and then the next ship was out of range of the remaining one. Or the VCX was to far away to bring it back to me.
Mid-game Harrow came in close, and unfortunately for Alex it got focus-fired to death before it could do more than 1 round of shooting. But because of Harrow being able to turn so well, it didn’t block the ISD like I’d hoped. So yeah, had to tackle both. >.>
At one point I bumped one of my ships with my hand while I was measuring movement, and turned a “I’m not sure if this will ram my own ship” into a “yeah, that’s definitely going to ram”, which really hurt. As well at another point I forgot to use an Engineering token on my AF. This turned out ok, as I used it the next turn, but it didn’t have to have gone that well.
Later, the CR90 spun around the back of his fleet and grabbed a token and put the killing blow on the ISD. That was nice, as I wasn’t sure I was going to be able to get it until I had pinged all its shields down and had 5 damage on it from squadrons!
Overall, I feel like I played this game well, but made a couple small mistakes that came from nerves and mainly playing Vassal (where you can’t accidentally bump a model…). It ended 371 to 137 for me, which is a 9-2, an excellent score. And calculating it out now, the missed objective points wouldn’t have gotten it to a 10-1 so that’s nice to know.
Game 2
Bolstered by a good win, but rushed by the event schedule, I moved onto my next game against a now-local Mackenzie. He’s a really solid player, but I don’t think I’ve played him in any local event yet.
He had an ISD, a Corvus Raider and a bunch of bullshit Empire squadrons and that’s it. A bold fleet that did him really well.
He had a bid of 28 points, and hemmed over whether to go first or second and played a guessing game to guess what objectives I’d taken with the fleet I had on the table. He was surprised to hear my red objective was Ion Storm, one he hadn’t played before, so he immediately choose second and that objective, which pleased me as my plan had been to play that one all day.
I set up to broadside behind my obstacle wall, he deployed Corvus and then all his squads and then his ISD. I deployed my GR to the left, trying to bait him to deploy left, but it didn’t work so it was very nearly 20 points completely wasted in this game.
Turn 3 or 4 Mack made this move:
He deliberately flew it off the table. Which I loved. I love when objectives make people make choices they wouldn’t make otherwise. He decided that he was going to lose the Raider anyway, with very little effort on my part, and that letting me ping it for points wasn’t worth it for him.
In that same photo, you can see the AF trying to get away, at the top. A major mistake I made this game was not having enough squadrons to block his bombers from putting a bunch of shots into the side of it, and minutes later it was dead from those same squadrons. This is a weakness of the fleet that I mean to shore up — the VCXs are good at making people play Ion Storm, but very poor at protecting flanks.
I lost this game 128-269, which is only barely an 8-3 for him. I lost all but one of my squads and the AF, but not Admo or the GR, and I got a good number of tokens and only let him have 1-2 tokens.
Game 3
Lastly, after a solid win and an ok loss, I played on the second table against Shmitty, of Steel Strategy fame. I listen to their podcast, so I knew he was coming and I’d fortified myself against getting all fan-boyish.
He was playing a variation on a fleet he’s made a little famous by winning GenCon with it. A Liberty, a CR90, Yavaris, a Pelta, 4 X-Wings, Biggs, Jan Ors and a Y-Wing. He choose first player and choose my Ion Storm.
As you can see, he deployed with his Liberty and CR90 facing towards the edge, which spooked me into forgoing my usual sideways-past-the-rocks plan, and into heading straight forward. I feared that going for the sideways movement would end with me trying to take his Liberty on at the front. My thought was that I could still get a broadside if I turned up.
The GR-75 was used as bait, ineffectively, again. Again, I basically played without it, which was a silly idea. If I do this fleet again, I’m going to stop that.
One good thing about the straight-forward plan was that I found I liked going past the rocks, it felt good to try to stop my opponent from getting close to them by using my ships. 😛 So I’m wondering if a future plan has the fleet doing that more, but not in such a silly way. And then maybe using Ezra to move rocks when I get to far away.
This photo I took after it was relevant. At one point I flew my MC30 forward, expecting that I’d take a bunch of damage but then be able to fly it out and past at speed 3 because his Liberty front arc would get one shot and then fly past me. He used a very interesting maneuver where he hard kinked the tool at the 1, and rammed me at 2, which pushed his ship into a turn that wouldn’t have been legal without the ram. The use of this, was that he did nearly a 90 degree turn at speed 1! Which put his front arc on my 30 and destroyed it.
Ultimately both our fleets met at the same point, just past the rocks and I got a good number of objective tokens, but only killed his CR90 while he tabled me. The game was 89-400 for him, which was a 10-1.
Talking with him afterwards, he thinks I should have gone sideways instead of up, but sped up to meet his Liberty+CR90 past the rocks but still in a broadside. This would have left his squadrons+Pelta a little less useful, or force them to fly hard to meet me, and leave his fleet unable to bring all its power at one point. Instead I did that bad idea to myself. 😛
Conclusion
That’s about it, not much else to say. I’ve got some ideas for how to change the fleet up, while sticking with Ackbar, but I think I’ve got some research on the Prime data to do before I dig in. I’m not sure whether I want to go full Ackbar with a big ship, or to stick with the AF, and there’s a bunch of follow-on effects that will come from that decision.
I also remembered tonight that the Starhawk was my original hope for this tournament, because I was really loving playing it on Vassal. BIG STOMPY SHIP.
Also I need to play more, so I’m going to look into putting my neck out and maybe getting a Vassal game with a non-Duke person. It’s hard because the voice chat annoys my wife, so I try to limit it to once a week. 😛
Thanks for reading, and again huge thanks to James for running it. It takes a lot to sacrifice your time for your community and it it much appreciated!
And lastly, a few closer photos of the board and the ships I brought to Armada Prime in Vancouver.
I showed some photos to a friend, and he suggested I add some vegetation to “break it up a little”, but the only plants I had kicking around the house were dust coloured…soo….no so much breaking it up.
I don’t know if it was clear, but the photographed fleet is the one I brought to the Prime (I wrote this before the event, but am scheduling it for after. This is weird.) It’s a bit of an off-meta fleet, but I think it has some parts that will catch people off-guard, and also has the ability to score a lot of points, and maybe not lose a lot of points. I saw yesterday. Or…will see yesterday.
I think if I end up bringing a variant of this fleet to another event, I’ll have to paint the Assault Frigate. Someone on the FFG forums claimed that it is the worst stock painted ship, and looking at it more, I might agree. (haven’t stared at a lot of Empire ships though).
After having finished building this guy last time, it was time to add paint. I talked with some friends, some of whom recommended maybe masking off the ISD and leaving the stock paint job, considering my last attempt at painting a space ship went very very poorly. I took the bull by the balls and primed it anyway, and prayed for deliverance.
I wanted to use my airbrush again, and wanted to wait for a solid block of time to do that (like a weekend, with less toddler-related interruptions over nap time). So I did brush painting on the ISD. It’s a fairly easy scheme:
Codex Grey base
Fortress Grey edging on all the panels, and a little drybrushing when the panels got to small.
Ulthuan Grey, same as Fortress.
Nuln Oil in the vertical parts and to start building some shadows.
And that’s it! I didn’t want to over do it, as it’s stuck in sand and painting the desert would add some more colours to it.
Next up, airbrushing.
I have a love-hate with my airbrush. I’ve always felt like I could do some cool things with it, but more often than not I’m trying and failing. I needed this to work, and I barely even know why!
I bought an obscene amount of GW airbrush paints, because the GW is half a block from my house, found some time that my wife wouldn’t be annoyed by the sound, and got busy. I started by using a mid-tone colour all over, then highlighted up and shaded down with paint, rather than washes/glazes/etc.
For the first time (maybe) I felt like the airbrush was working with me instead of against me! I’m super happy with how this stage went, and even had a couple moments where I felt like I was building a cool gradient on some of the hills by lightly dusting just a little bit, pulling the trigger back a little less in places and more in other places. You know, like I knew how to use the damn thing!
While doing this, as I mention above, I made sure to add some dust and dirt colouring to the ISD.
I wasn’t super happy with the ending highlight colour, I wish it was more yellow and less white, but it has it’s charm, and I think trying to fix it much at this point would have taken more time and effort and risk really messing it up!
Airbrushing done, I started going in with a brush in places. I did a bunch of washes to deepen some shadows with a Fuegan Orange and Drakenhof Nightshade. I painted the edges of the board to make it classy.
In the middle of all this, I took part in two other hobbies I picked up since Christmas. My in-laws got me a beer making kit, so I bottled some “Canadian Blonde” that had been fermenting since I got back. And my in-laws got my wife a bread maker, which is really a gift for me, and I made a honey nut loaf which is fucking fantastic.
At this point on the board, it’s about letting your eyes glaze over a bit, and “feeling” where paint needs to go. The board is done, but when you go all magic-eye on it, you can see places where it makes less sense, or the shading isn’t good or correct (or you forgot).
This is about when I put some ships and squadrons on it again to take a couple more photos of some space ships flying above a wreck!
Next post will be some close-ups of places, and I’m hoping the one after that will be a Prime tournament report which has me winning a ticket to Armada Worlds!
I finished the display board, but we won’t get to that for a couple days.
After I finished the board and put all my ships on it, it was exceedingly obvious that my squadrons had no paint on them. The main ships come out of the box painted, but not the tiny little squadrons. I had to fix this before the Armada Prime this weekend.
My fleet is now set, not in stone, but in a stone-like substance that could still be changed but is unlikely to. So I grabbed the 12 tiny little space ships and set to painting!
I started with white primer, as is my tradition, and then split the painting roughly by ship:
VCX – Drakenhof Nightshade all over, drybrush Fortress Grey, drybrush Ulthuan Grey, drybrush white highlighters, Trollslayer Orange spot.
Y-Wing – Drakenhof Nightshade, drybrush Fortress Grey, drybrush Ulthuan Grey, Dwarf Bronze spot, Nuln Oil over it.
Shara Bey/A-Wing – Rakarth Flesh, Trollslayer Orange triangle and some spots, Bloodletter glaze all over, Scar White on the wing tips and guns.
Black + ‘ardcoat for shiny cockpits, and Ice Blue for all the engines.
When I got half way through the A-Wings, I was pretty sure the colour combination was not going to work. I had this feeling that Rakarth was a lighter beige than it really was, and when I put the orange over it, it was pretty bad. That’s when you start experimenting! The Bloodletter was an attempt at bringing the two colours together, and the Scar White really gave them a great pop.
Before starting, I scoured the FFG painting forums for examples of how people painted these things. While I could have “just started painting”, I think the old adage about knowing the rules before you break them is a solid one. See what others have done, then try to improve on it.
Here are two links to some painting threads of folks on FFG who are doing a phenomenal job, and who’s style I attempted to emulate:
I don’t recall what possessed me to start this project. Maybe it was buying tickets to Adepticon this March, in Chicago. Maybe it was when Armada local James suggested a “fleets on parade” event at the Vancouver Prime Armada event on January 18th. Who can say what madness came over me, but it did and now I must fulfill the desires of my muse to the end.
Design
I started with a piece of paper. Actually, I started with an idea, but since that part was a flash out of no where, the paper is the first actual action I took. Having done this kind of thing before, I knew you had to plan out where things would sit on the board, otherwise you end up with squished models, rather than an aesthetic layout.
It’s also important to know how many models should go on the board. I cheated a bit, because really I should be planning this for The One Fleet to Beat Them All, but since I have more hobby skills than flying skills, I’m still testing fleet ideas. So I drew out spaces for 5 ships and 8 squadrons, which is enough for most fleets I’ll fly. The only time I’ve done more than 5 ships, I hated the fleet — the ships were entirely to squishy for my style of play.
I secured an ISD from Facebook (thanks Alex!), pulled a piece of hardboard from my hobby area, took some ships from my case and put them down roughly where I had planned out on the paper. This gave me an idea of how big the board should be, and by luck it was almost right, just needed a little trim off one side.
Unfortunately, I recently had a purge of hobby materials and wasn’t sure I would have enough foam. I took out every piece I had and laid it out – it wasn’t enough. I started cutting things in half and creating angles and put it all out on the board and felt like I could make it work combined with some other materials.
At the end of this, I had some foam and an ISD placed (no glue!) on a piece of wood.
Gluing
Seen here – a bunch of heavy objects sitting on foam and white glue. I left for Christmas holidays shortly after this, so didn’t get to work on it for a bit.
Filler and Rocks and Sand and Attachment Points
I made a display board a while back for my Blood Bowl Undead team that had specific places for models, but usually my boards have just been open spaces. Because Armada uses many stands to hold floating space ships, I needed a solution to put them on the board. (also, in one of the previous Adepticon board posts, I claim I bought the Model Lite from Magic Box, great to know!)
For the squadrons, I drilled holes into coloured wooden sticks probably used for kids crafts and glued them into the board. For the ships, I got plasticard thick enough for the ship bases that FFG uses and dug out space for the stand to attach onto them. It all works pretty good, which you’ll see in a bit!
I used a wonderful product called Model Lite. I don’t recall where I got it from, because it was in my hobby stuff. It’s so light that when you pick up the little jar, it actually feels lighter than a jar of air should feel. You know, like you picked up a helium tank? (no? haven’t done any kids parties recently?) I filled gaps that seemed wrong and gave some texture to some flat places.
On top of that, using the idea that you go from “biggest to smallest” with your features, I glued some small pebbles, then some larger pieces of corkboard to it.
The little holes on the edge of the board were not my idea, they were a serendipitous thought from my 2.5 year old. I’ve been building this upstairs, rather than in my usual hobby area because it’s out of the usual path of traffic. My kid went up there without me knowing, and took the bottle of super glue and punched a lot of holes into the foam. I was mostly stunned because I didn’t think she came up there, and also because super glue+toddler == probable hospital trip that I narrowly avoided, but, ultimately, I like the holes.
Edges and Corners
I was pretty sure I’d never finished the edges of a display board before, opting instead to paint the edges, but the photos above from Adepticon 2014 appear to say otherwise.
I took some thinner plasticard and cut it up into rough sections for my edges, then cut it out to fit better. In hindsight, I should have left it really rough and then glued, because it was much easier to cut to fit once it was fully attached to the board.
I didn’t have a plan for the corners when I did this, and I kind of wish I had. As I was doing it, I started thinking about photo frames or I dunno, like something in the hardware store. When I asked in CHOP! chat, Patrick suggested that diorama builders he’d seen used filler on the edges and sanded it down after. You can see my attempt at that above – I’m reasonably happy with it, but I think that if I’d planned to do this from the beginning it would have been much nicer. You can see that one edge was a little to short, and another I didn’t cut entirely straight. I’m certain it won’t be noticeable later.
Then I used the Model Lite and filled in the corners on top. The white glue holding the edges didn’t survive this, so I super glued the corners down!
So Much Sand
Coming down to it. I bought some “fine ballast” from Central Hobbies, and mixed it with white glue and water. I haven’t done this in ages, preferring the oxide paste from ages ago. This was cheaper and more accessible, so here we are.
It’s kind of a “slurry” texture, applied with a very large and very old brush. One day this brush is going to kick the bucket, and I’m going to have to write an old friend I haven’t spoken to for years that our old brush finally died. This project was not the end of it.
I initially was going for 100% sand coverage, but the more I did it the more I felt like the natural texture of some of the cut foam edges were worth saving. I went for 100%+ coverage on top, creating mounds, but went light on the slopes. I’m torn between thinking I’ve ruined it, and thinking it doesn’t look good in the slightest. >.<
As I’ve probably mentioned in previous posts, you want 100% glue coverage here. The foam melts when you try to prime it with aerosol primer (which I will), and a good white glue layer protects it all. Heavily watered down, of course.
Ships!
Lastly, I put some ships on it to make sure it all still worked! I’m glad I did, because the centerpiece slot was (1) no longer sized to fit the base and (2) had to much sand around it to allow entry. I had to clear some stuff away and re-glue.
I also lost one of my squadron holes in all the sand. 😛 I found it again!
Tomorrow night I start priming, and then I have to find my airbrush paint and sort out my airbrush and and then dry brushing sand textures! I’m not sure about the ISD either, honestly. It’s a very expensive model glued to a lot of garbage, and I’m not sure I’ll be able to do as good as the stock paint job. >.< Painting ships is hard!
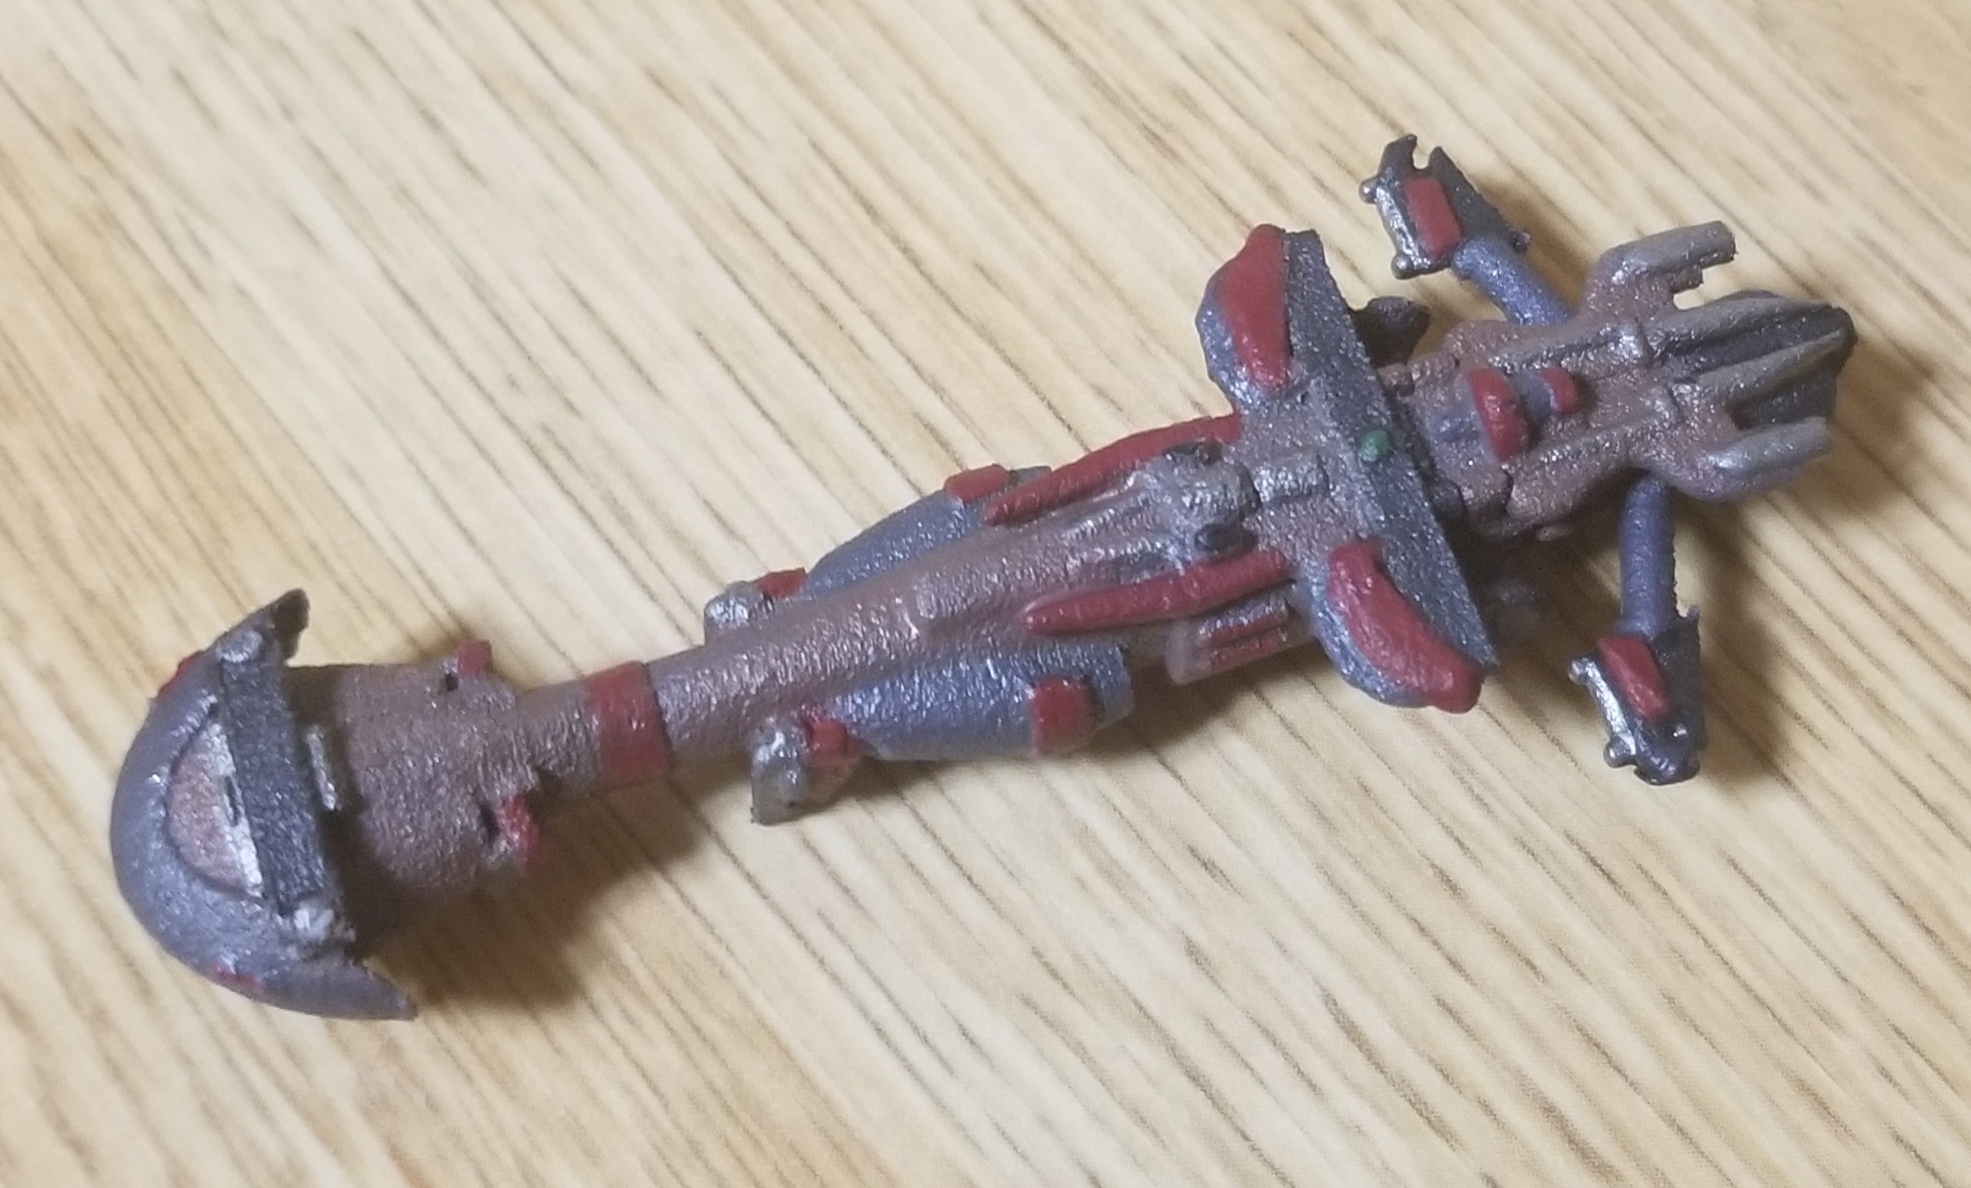
I’m not 100% convinced this is a good idea. I mean…the default paint job is probably better than whatever garbage I’ll put on it? There it is, compared to the Braha’tok which is a really bad paint job.
But then…is the Braha’tok bad because I’m bad, or because I used to large a paint brush, or because I’m not used to painting space ships, or because the Braha’tok model doesn’t have a lot of crisp detail?
Someone pointed out that the blog wasn’t rendering correctly in Safari, so I checked and it looked like shit. Then I checked Chrome mobile and it looked like shit, and it’s probably because web standards have changed a lot a lot since 2010 when I started the blog and set the theme up. So let me know if anything looks off!
It has been well over a year since I last painted. It’s weird to have a thing that I spent so much time and effort trying to improve become a thing I never do. I’m thinking about trying to get out to Adepticon in 2020, and I remember being crazy excited about all the painting and modelling workshops and now I just…why?
Adepticon. Armada Worlds is there next year. I don’t have a ticket yet, and it’s invite only, but I’ve got 1-2 Primes I’m planning to attend to try to win a ticket, and the Last Chance Qualifier at Adepticon would be fun to play in even if I didn’t make it to the next day.
From there, I start thinking about what makes Adepticon amazing (there’s a lot), and one of the things is all of the crazy cool paint jobs and dioramas and models and such. That leads me to — maybe I should paint my ships?
My thought is that at least one Hammerhead Frigate will appear in almost any fleet I make, so why not try to paint that? I find this photo, which does not help because it’s the wrong scale ship. I find this thread, which does help because, wow.
AND THEN I decide to finally paint a Braha’tok Gunship I bought from Mel’s Miniatures last year, around this time of year, so I can do a test paint.
Here’s an awesome Twitter thread on the Braha’tok, which is a ship I’m sure you’ve never given any thought to it’s existence. It is a neat little ship, and one of the photos in that Twitter thread is the original ILM modellers assembling it very quickly out of a bunch of other model kits they had lying around. Go read the thread if you love modelling and love Star Wars!
I start by building a little table. I’ve really only ever painted Warhammer stuff, so not having a base that I can prime against is weird. It’s made of some wood I found in my bitz box, and has some corners inside it to keep the legs square.
I primed it white, and immediately panicked because it got all primer frosted. >.< Or maybe, it started frosted because the “Mmch” version of this model is pretty frosty already. (a photo of the same model, linked to from the store page) I wish I had bought the non-Mmch version, because photos of Mel’s other stuff look great. Or maybe the 3d printing needs some smoothing done by me? I don’t even know. Here’s a photo of the non-Mmch (I don’t even know what Mmch means) version, also linked to from the store page comments.
Then I started with Codex Grey + Ulthuan Grey (the first bottle of Codex I opened had completely dried up, luckily I had two [or more]). Then just Ulthuan, then White. I want a semi-Clone Wars Republic scheme because I love the orange and white, so painted Troll Slayer Orange and highlighted it up with white.
Then I found my bottle of Nuln Oil had been entirely used/dried up, so I bought a new one and also a Fuegan Orange because I figured the orange shade would be useful. Went in and did Nuln in the recesses and around the bottoms of the rounded shapes, and a bit of the Fuegan in the recesses of the orange pieces.
Crazy frosty, and the detail is really light. I’m not really happy with how it turned out, because of those things and because I don’t really have a lot of freehand skills I could have used to spruce up such a tiny model.
I’m not sure where to go from here, as this experiment is feeling likey a failure and I’m not sure I want to prime and mess up a pricey Hammerhead model. Any thoughts?


