Browsing Category

Featured Images

Featured images.

Featured Images

Kroxigors – Final 2

The other photos of these guys weren’t so awesome, so I took the time last weekend to take some better ones. Some sunlight, a white box and a few ambient lights later and I have some decent photos.

Also, Cin might be right. Dude on the left is pretty adorable :P.

Featured Images

Kroxigors – Final

Alright! These guys were 3/4s finished when I got inspired to paint/assemble again, so they were an obvious choice for finishing up. I’m VERY happy with how they turned out (although slightly embarrassed about the blurry guy on the left…bad photographer!). Went to GW tonight, almost had a game but there was a couple people there ahead of me, so I sat down, pulled out some models and a paintbrush and had at ’em. The result – finished kroxigors. Awesome. 🙂

Particularly pleased with their backs. Horns down the center are a simple Scorched Earth, Dessert Yellow, Bleached Bone combination, heavily watered to allow for decent blending (actually, now that I look again…these photos all suck…damnit >.<). The scales are my favourite part – again, really simple – Mechrite Red, Blood Red and Blazing Orange. My favourite thing is that I don’t think I’ve ever successfully done a very light edging of a strong highlight colour. Whenever I try, it usually ends up looking to strong, to thick, to blocky. But this time…oh this time, I took my time, had the right amount of water and it worked out wonderfully. You really should see them in person, they are amazing.

This gives me hope – it means that I should have two really amazing looking units, and two pretty good looking units and my army is just going to pop off the table with the strong reds/oranges against the cold gray. Very excited to start working on the next 10 Temple Guard (yes…I assembled another 10 of them…).

Featured Images

Wizards – Final

I bought Duke the Empire Wizard box for his birthday. I also promised I’d paint them for him, for his fledgling Empire army. I assembled and primed them…and then, like so many other projects on my desk, left them to languish.

But a sudden flush of painting/modeling inspiration, brought on by an invitation to the Throne of Skulls tournament in June, has had me attempting to clear some of the crap off my desk. The first step – finish these two models so I didn’t have to feel guilty about them sitting on my desk anymore 😛

The disclaimer: I suck at human flesh >.<. Also, the cloaks were less interesting to paint than I had hoped. Sooo…overall…models less awesome than I had hoped :(.

The first is a Life wizard in a delicious Snot Green.

The second a Death (or Shadow) wizard, in Lich Purple.

(I didn’t do the bases on purpose – left those to Duke’s thematic desire).

Featured Images

Temple Guard Banner Final

I got the banner done in time for the tournament.

I recommend not following my steps exactly. This process could have been done better.

So, last we spoke I had assembled the banner and was moving onto painting it. I laid the fabric flat and started painting. You can see the result below – not spectacular, but not bad.

Someone commented that it wasn’t bright enough, in the sea of my bright yellow spotted saurus, which this is definitely a flaw. The issue here is that it is relatively difficult to get a bright colour down, as it just soaks in and diffuses into the black fabric.

I finished painting it and went to give it a wave…and discovered that white glue doesn’t set immediately. >.> Whoops. I lucked out, in that the multiple layers of paint gave it a bendable quality, so I bent it as much as I could without cracking the paint and then watered down some white glue and painted it on. I repeated that process 3 times before I could get a wave on it that looked any good.

Some people at the tournament recommended:

  • Paper. Actually, the person I was talking to was complaining about how his banner ripped. So he didn’t recommend it, but it’s an option.
  • Pop can aluminum. Warning: You must ensure that you file down the edges, lest you lose flesh one day.
  • Tin foil. I thought this would rip as well, but apparently you use layers of it and super glue them together to create a relatively thick piece of tin foil cardboard that won’t rip. Pretty smart, assuming you don’t wrinkle it in the process.

A tournament update to follow in a day or two. Later!

Featured Images

Lizardmen Temple Guard Final

I don’t recall when I started working on these guys. It was last year sometime I think. Actually…I could probably look this up, since I bought the unit shortly after the new temple guard were actually released. Looks like it was around February of 2009. So going on a year and a half.

However, at long last, I present…

Continue Reading

Featured Images

Tyranid Hive Guard 3

Last post on this guy, since I’m calling him done.

Since the last post I added:

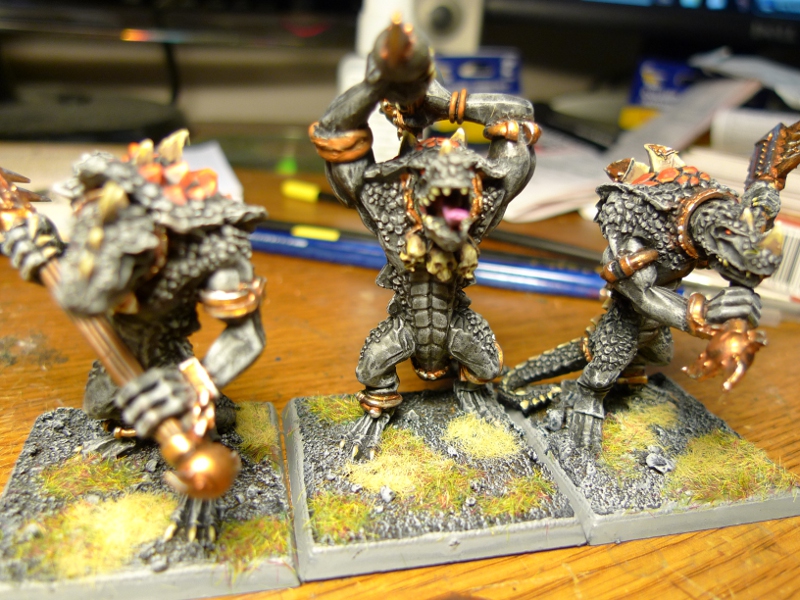
  • A 1:3 mixture of Hawk Turqoise and Scaly Green to the top edges of his skin, and every opening.
  • Goblin Green base rim, and some flock on top of the grey gravel.

It’s funny…looking at the photos, the pink and the green highlight are really stark. But sitting at my desk, while I’m painting them, they are relatively calm.

I’m wondering if next time I should paint the HT+SG highlight directly over the original SG base, and then wash over that. I worry that the highlight will get muted by the wash, and also that the skin will be ridiculously shiny (it will be – just a question of whether it’s bad or good ridiculous).

Looking at it now, I’m pretty happy with the green rim. When I was painting it I was thinking “Oh god…goblin green rims…how old is this army anyway?” It’s been years since I painted with the goblin green. But I think it’s a nice colour to go with the yellow and green of the model itself.

I’m really happy with how his armour turned out. More of that in the future.

Links to the other two posts, for ease of reference:

My next 40k project is to finish the Deff Koptas! That will be another project where I start writing when I’m already 3/4s of the way through, but there’s still some work to be done.

Featured Images

Ork Flash Git

I didn’t paint this one, but I wanted to share it and it’s tale anyway.

There was an auction at my local Games Workshop a couple weeks ago, along with some mini-games for prizes. They had as prizes some mail-order only models, and I knew there were about three things I wanted as prizes so I went down to see if I couldn’t make it happen.

I lost every single game. Poop.

Towards the end of the day, one of the local kids won a game and upon looking through the box of prizes realized that there was nothing he wanted. I was standing around and he asked if there was anything I wanted, and I sort of sputtered out “Oh yes!” and picked out the Ork Flash Git. I’m amazed – I’ve been known to give prizes that I don’t care about to kids, but that’s because I have a job and I can really afford to buy just about any model I happen to desire. Good kid.

At the auction, the last three things put up for auction were staff paint jobs, as they usually do, and there was one particular staffer who’s work I admire. I bid $10 on him up from $1 and won his work without a fight. As I paid my $10, I tossed the Flash Git at him, saying “I play Deathskulls”.

(At the end of the day I also purchased the Animosity Orks, so look for them in a painting/modelling project soon!)

Paint Scheme

  • I really have no idea, but I wanted to point out a couple awesome things he did.
  • The squig is my favourite part. Tiger squig! It also has a targeting reticule for an eye. Awesome.
  • The skin is incredibly well highlighted, I can’t even begin to figure out how many layers and what colours he used.
  • All of the metal has been painted it’s primary colour, and then has a little splotch of some metallic colour painted in random locations, where the paint has chipped.
  • He used a similar highlight scheme as the skin (with different colours) to paint the gun-barrel wood grain.